If your folders have disappeared from Quick Access in Windows 10 File Explorer, follow these simple fixes to restore them.
Using AOMEI Partition Assistant:
By following these solutions, you should be able to restore your Quick Access folders and ensure they stay visible in File Explorer.
What do I do if Quick Access is Missing?
1. Restart File Explorer
- Press Ctrl + Shift + Esc to open Task Manager.
- Find File Explorer under the Processes tab.
- Right-click File Explorer and select Restart.
2. Check Quick Access Settings
- Open File Explorer by pressing Windows + E.
- In the top menu bar, click on View.
- Click on Options and select Change folder and search options.
- In the Folder Options window, ensure both Show recently used files in Quick access and Show frequently used folders in Quick access are checked.
- Click Apply and then OK.
3. Restore Quick Access Folders in File Explorer
- Open the File Explorer from the Taskbar.
- In the File Explorer, click on the View tab.
- Click the Options drop-down menu and select “Change folder and search options“. It will open the Folder Options window.

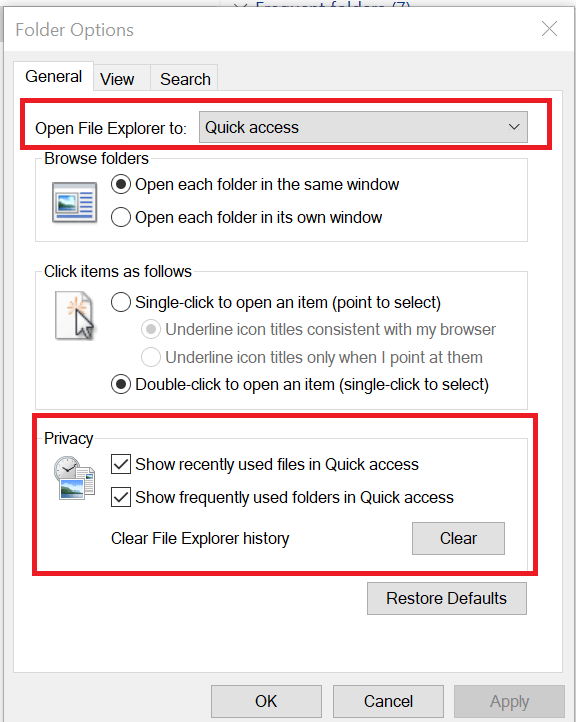
- In the General tab, make sure “Open File Explorer To:” to is set to Quick Access.
- In the Privacy Section, check “Show recently used files in Quick Access” and “Show frequently used folders in Quick Access” options.

- Click Apply and OK to save the changes.
- Close the Folder Options window and the File Explorer.
- Open “File Explorer” again and check if the Quick Access folder is visible.

4. Clear File Explorer History
- Open File Explorer.
- Click on the three horizontal dots (Action button) in the upper right corner.
- Select Options.
- In the Folder Options window, under the General tab, click the Clear button in the Privacy section.
- Close File Explorer and reopen it to see if the issue is resolved.
5. Re-pin All Quick Access Items
- Open Command Prompt as an administrator (press Windows + X, then select Command Prompt (Admin)).
- Run the following commands one by one, pressing Enter after each:
- del /F /Q %APPDATA%\Microsoft\Windows\Recent\*
- del /F /Q %APPDATA%\Microsoft\Windows\Recent\AutomaticDestinations\*
- del /F /Q %APPDATA%\Microsoft\Windows\Recent\CustomDestinations\*
- Restart your computer.
- Open File Explorer and re-pin your favorite folders to Quick Access.
6. Run SFC and DISM Scans
- Open Windows PowerShell as an administrator.
- Run the following commands and press Enter after each:
- sfc /scannow
- dism /online /cleanup-image /restorehealth
- Restart your computer.
7. Use Data Recovery Software
If your folders were deleted or lost, you can use data recovery software like AOMEI Partition Assistant or MiniTool Power Data Recovery.Using AOMEI Partition Assistant:
- Download and install AOMEI Partition Assistant Professional.
- Launch the software and click Recover > Recover data on the top toolbar.
- Select the source drive where the lost folders were saved and click Start Scan.
- After the scan, locate the files you want to recover, select them, and click Recover x files.
- Choose a location to save the recovered files and click OK.
- Download and install MiniTool Power Data Recovery.
- Launch the software and select the partition that contained the lost files to scan.
- Browse the scan results to find and select the files you want to recover.
- Click Save and choose a new location to save the recovered files.
8. Create a New User Profile
- Open Settings by pressing Windows + I.
- Go to Accounts and select Family & other users.
- Click Add someone else to this PC.
- Follow the prompts to set up a new user account.
- Log in to the new user account and check if Quick Access works.
9. Rollback Windows Update
- Open Settings (Windows + I).
- Navigate to Windows Update > Update history.
- Select Uninstall updates and choose the problematic update to uninstall.
By following these solutions, you should be able to restore your Quick Access folders and ensure they stay visible in File Explorer.