The 0xc000007b error typically indicates a problem with the game or application's compatibility with the operating system or with the system's configuration. Follow these solutions to troubleshoot and resolve the issue.


By following these solutions, you should be able to resolve the 0xc000007b error and get your application running correctly. If the issue persists, consider seeking help from a technical professional.
How to Fix the 0xc000007b Error on Windows 10?
1. Restart Your Computer
- Click on the Start Menu.
- Select the Power button.
- Choose Restart from the options.
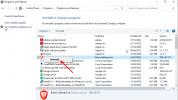
2. Reinstall the Application
- Open the Start Menu.
- Type "Control Panel" in the search bar and press Enter.
- Click on "Programs and Features."
- Find the application causing the error, right-click on it, and choose "Uninstall."
- Follow the on-screen instructions to complete the uninstallation.
- Restart your computer.
- Reinstall the application from its official source.
3. Run the Application as Administrator
- Right-click on the application’s shortcut or executable file.
- Select "Run as administrator."
- Click "Yes" if prompted by User Account Control.
4. Update Your .NET Framework
- Click on the Start Menu and type "Control Panel" in the search bar, then press Enter.
- Click on "Programs and Features."
- Click "Turn Windows features on or off" on the left side.
- Check the box next to .NET Framework 3.5 (includes .NET 2.0 and 3.0) and click OK.
- Follow the on-screen instructions to complete the installation.
- Restart your computer.
5. Update Your DirectX
- Download the DirectX End-User Runtime Web Installer from the official Microsoft website.
- Run the downloaded installer.
- Follow the on-screen instructions to complete the installation.
- Restart your computer.
6. Reinstall Microsoft Visual C++ Redistributables
- Open the Start Menu and type "Control Panel" in the search bar, then press Enter.
- Click on "Programs and Features."
- Find all Microsoft Visual C++ Redistributable packages, right-click on each, and choose "Uninstall."
- Download the latest versions of Microsoft Visual C++ Redistributable packages from the official Microsoft website.
- Install each package.
- Restart your computer.
7. Check for Windows Updates
- Click on the Start Menu and type "Settings" in the search bar, then press Enter.
- Click on "Update & Security."
- Click on "Check for updates."
- Download and install any available updates.
- Restart your computer.
8. Run the Application in Compatibility Mode
- Right-click on the application’s shortcut or executable file and select "Properties."
- Click the "Compatibility" tab.
- Check the box next to "Run this program in compatibility mode for" and select an earlier version of Windows from the drop-down menu.
- Click "Apply" and then "OK."
- Run the application.
9. Check Your Disk for Errors
- Open the Start Menu and type "cmd" in the search bar.
- Right-click "Command Prompt" and select "Run as administrator."
- Type chkdsk c: /f /r and press Enter.
- Type "Y" when prompted to schedule the check on the next restart.
- Restart your computer.
10. Perform a Clean Boot
- Open the Start Menu and type "msconfig" in the search bar, then press Enter.
- Click on the "Services" tab.
- Check the box next to "Hide all Microsoft services" and click "Disable all."
- Click on the "Startup" tab and click "Open Task Manager."
- Disable all startup items.
- Close Task Manager and click "OK" in the System Configuration window.
- Restart your computer.
11. Change the Value of the LoadAppInit_dlls Key
- Press Windows + R to open the Run dialog.
- Type "regedit" and press Enter.
- Navigate to HKEY_LOCAL_MACHINE\SOFTWARE\Microsoft\Windows NT\CurrentVersion\Windows
- Double-click "LoadAppInit_DLLs."
- Change the value to 0 and click OK.
- Restart your computer.
12. Create a New User Account
- Open the Start Menu and type "Control Panel" in the search bar, then press Enter.
- Click on "User Accounts."
- Select "Manage another account" and then click "Add a new user in PC settings."
- Follow the on-screen instructions to create a new user account.
- Log in to the new user account and try running the application.
By following these solutions, you should be able to resolve the 0xc000007b error and get your application running correctly. If the issue persists, consider seeking help from a technical professional.