Having a proxy server that keeps turning on in Windows 10 can be quite frustrating. This issue can interfere with your internet connection and cause various network problems. If you're experiencing this persistent problem, don't worry. We've compiled several effective solutions to help you fix it.
A proxy server that keeps turning on in Windows 10 can be a nuisance, but you can fix the problem effectively with these solutions. Start by checking for malware, then reset your Internet Options, and proceed with more advanced solutions if necessary.
By following these steps, you can ensure a stable and reliable internet connection on your Windows 10 device.
Why Does the Proxy Server Keep Turning On?
Before diving into the solutions, it's essential to understand why this issue occurs. Here are some common reasons:- Malware or Adware: Malicious software can change your proxy settings without your consent.
- Incorrect Network Settings: Misconfigured network settings can cause the proxy server to turn on automatically.
- Third-Party Applications: Certain applications can alter your proxy settings.
- Windows Update Issues: Sometimes, a Windows update might cause this problem.
How to Fix the Proxy Server Issue in Windows 10?
1. Check Your System for Malware
Malware can often change your network settings and enable a proxy server without your knowledge. Running a full system scan with your antivirus software can help detect and remove any malicious programs.
- Type Windows Security in the Search bar, and click on the relevant search result.

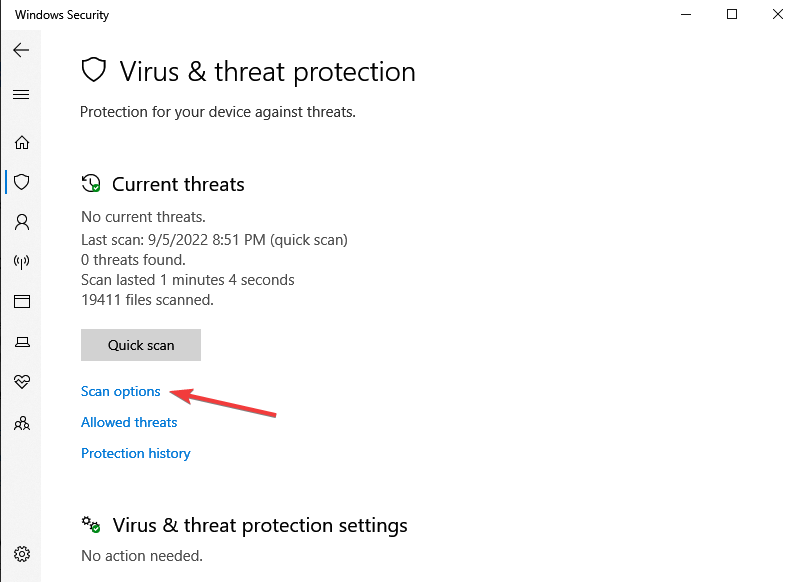
- Now, click on Virus & threat protection here.

- Click on Scan options.

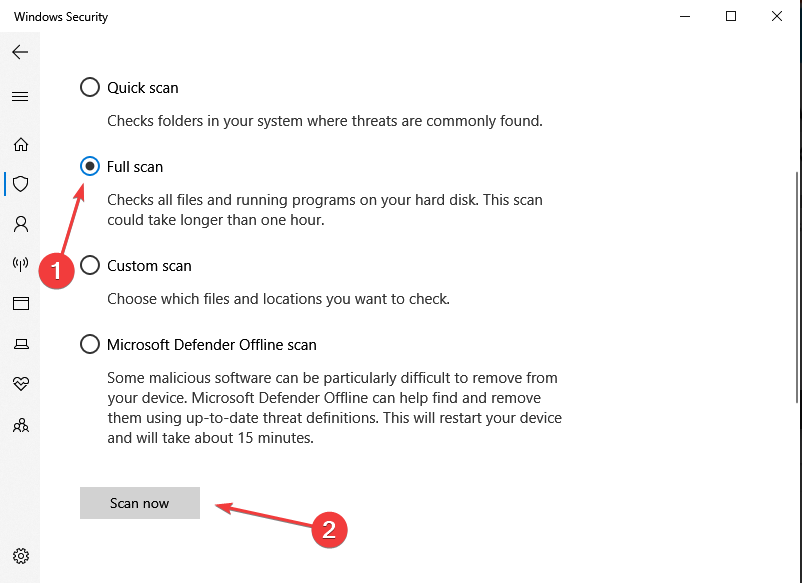
- Now, select Full scan and click on the Scan now button at the bottom.


2. Reset Internet Options
Resetting your Internet Options can revert unwanted changes to your proxy settings.
- Press Win + R, type inetcpl.cpl, and press Enter.
- Go to the Connections tab and click on LAN settings.
- Uncheck Use a proxy server for your LAN and check Automatically detect settings.
- Click OK to save changes.
3. Disable Proxy via Registry Editor
You can manually disable the proxy server by editing the Windows Registry. Be cautious while performing these steps, as incorrect changes can cause system instability.
- Press Win + R, type regedit, and press Enter.
- Navigate to HKEY_CURRENT_USER\Software\Microsoft\Windows\CurrentVersion\Internet Settings.
- Find the ProxyEnable DWORD, right-click on it, and select Modify.
- Set the value to 0 and click OK.
- Close the Registry Editor and restart your computer.
4. Check Your Proxy Settings in Group Policy
If you're using Windows 10 Pro, Enterprise, or Education, Group Policy settings might be responsible for enabling the proxy server.
- Press Win + R, type gpedit.msc, and press Enter.
- Navigate to User Configuration > Administrative Templates > Windows Components > Internet Explorer > Internet Control Panel > Connections.
- Double-click on Disable changing proxy settings and set it to Not Configured or Disabled.
- Click OK and restart your computer.
5. Reset Network Settings
Resetting your network settings can resolve various connectivity issues, including the persistent proxy server problem.
- Open Settings and go to Network & Internet.
- Scroll down and click on Network reset.
- Click on Reset now and confirm the action.
- Your computer will restart, and network settings will be reset to their default values.
6. Perform a Clean Boot
A clean boot can help identify if any third-party applications are causing the proxy server to turn on.
- Press Win + R, type msconfig, and press Enter.
- Go to the Services tab, check Hide all Microsoft services, and click Disable all.
- Go to the Startup tab and click Open Task Manager.
- Disable all startup items.
- Close Task Manager, click OK in the System Configuration window, and restart your computer.
A proxy server that keeps turning on in Windows 10 can be a nuisance, but you can fix the problem effectively with these solutions. Start by checking for malware, then reset your Internet Options, and proceed with more advanced solutions if necessary.
By following these steps, you can ensure a stable and reliable internet connection on your Windows 10 device.