Are you facing the Windows Update Error 0x8024200D on your Windows 10 device? This article provides clear and actionable solutions to help you resolve this issue swiftly.
How Can I Fix Windows Update Error 0x8024200d?
1. Running the Windows Update Troubleshooter
- Download the Troubleshooter: Click here to download the Windows Update Troubleshooter.
- Run the Troubleshooter: Double-click the downloaded file (WindowsUpdate.diagcab) to start it.
- Follow Prompts:
- For Windows 7: Wait until the troubleshooter finishes.
- For Windows 8 or 10: Click Next if prompted to run a newer version and then Apply this fix.
- Restart and Update: Restart your computer and try running Windows Update again.
2. Restarting the Windows Update Service
- Open Services: Press Windows Key + R to open the Run dialog, type services.msc, and press Enter.
- Stop Windows Update Service: In the Services window, right-click Windows Update and select Stop.
- Delete DataStore Files:
- Open File Explorer with Windows Key + E.
- Navigate to C:\Windows\SoftwareDistribution\DataStore.
- Delete all files in the DataStore folder.
- Delete Download Files:
- Navigate to C:\Windows\SoftwareDistribution\Download.
- Delete all files in the Download folder.
- Restart Windows Update Service: Right-click Windows Update in the Services window and select Start.
- Check for Updates: Try running Windows Update again.
3. Running System File Checker
- Open Command Prompt: Press the Windows Key, type cmd, right-click Command Prompt and select Run as administrator.
- Run DISM (if applicable):
- Type DISM.exe /Online /Cleanup-image /Restorehealth and press Enter. Wait for the process to complete.
- Run System File Checker:
- Type sfc /scannow and press Enter. Wait for the scan to complete.
- Restart and Update: After the scan, close the Command Prompt and try running Windows Update again.
4. Manually Downloading Updates from Microsoft Update Catalog
- Check Failed Updates: Press the Windows Key, type Windows Update, and press Enter. Click View update history to find the updates that failed to install.
- Identify System Type:
- Press Windows Key + R, type cmd, and press Enter.
- Type systeminfo and press Enter to find your system type (e.g., x64-based PC).
- Visit Microsoft Update Catalog: Go to the Microsoft Update Catalog.
- Search for Updates: Type the update number (e.g., KB3006137) in the search bar and click Search.
- Download the Correct Update: Select the update that matches your system type and download it.
- Install the Update: Double-click the downloaded file and follow the installation instructions.
5. Deactivating Third-Party Security Software
- Disable Antivirus: Temporarily disable any third-party antivirus, firewall, or malware protection software installed on your system.
- Try Updating Again: After disabling the software, attempt to run Windows Update again.
- Re-enable Security Software: Once the update process is complete, re-enable your antivirus and other security software.
6. Uninstalling peripheral drivers
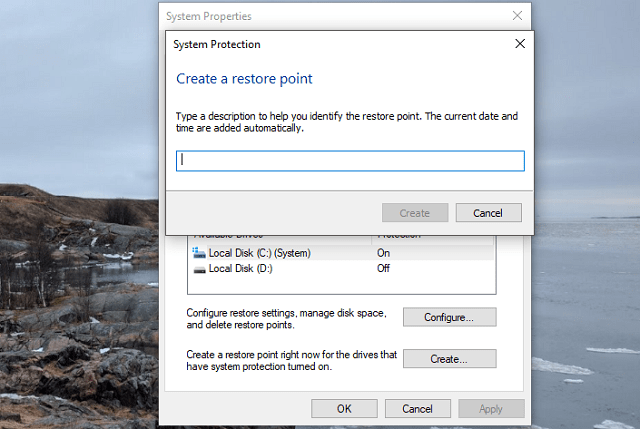
- On Search Windows, type Create a restore point.
- Up next, open System properties.
- In the System Protection tab, on the bottom of the list, click Create.

- Enter the description and create a restore point.
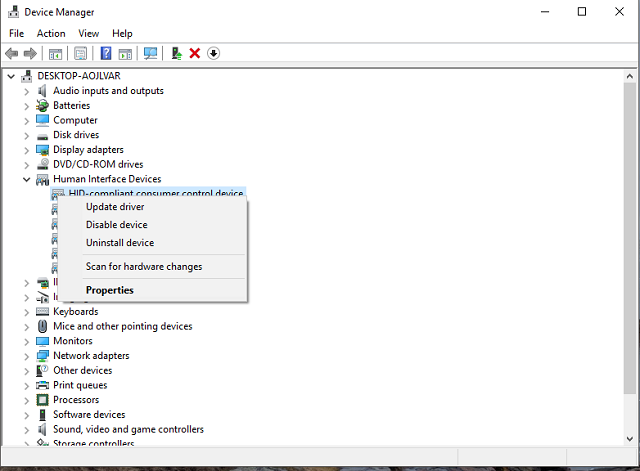
- Now, right-click Start and open Device Manager.
- Unplug all peripheral devices except the mouse and the keyboard.
- Go to their respective drivers and uninstall them one by one (printer, scanner, webcam, etc.).

- Restart your PC and try updating again.
- After the update, reinstall drivers.
7. Checking System Files for Errors Using DISM
- Open Command Prompt as Administrator: Press the Windows Key, type cmd, right-click Command Prompt and select Run as administrator.
- Run DISM: Type DISM.exe /Online /Cleanup-image /Restorehealth and press Enter. Wait for the process to complete.
- Run SFC: Type sfc /scannow and press Enter. Wait for the scan to complete.
- Restart and Update: After the scans, restart your computer and try running Windows Update again.
8. Restarting the Update and Download Service
- Open Services: Press Windows Key + R, type services.msc, and press Enter.
- Stop Services: Find Windows Update and Background Intelligent Transfer Service, right-click each and select Stop.
- Delete Download Folder Contents:
- Open File Explorer with Windows Key + E.
- Navigate to C:\Windows\SoftwareDistribution\Download.
- Delete all files in the Download folder.
- Restart Services: Right-click Windows Update and Background Intelligent Transfer Service in the Services window and select Start.
- Check for Updates: Try running Windows Update again.
9. Expanding System Partition if Necessary
- Open Disk Management:
- Press the Windows Key, type Computer Management, and open it.
- Select Disk Management:
- Under Storage, select Disk Management.
- Expand Volume:
- Right-click on the system partition (usually C
") and select Extend Volume.
and select Extend Volume. - Follow the prompts to allocate more space to the partition.
- Right-click on the system partition (usually C
- Restart and Update: After expanding the partition, try running Windows Update again.
10. Using Batch Script to Reset Windows Update Components
- Download Batch File: Download the batch file created to reset Windows Update components.
- Run Batch File: Right-click the downloaded batch file and select Run as Administrator.
- Follow Prompts: Allow the batch file to run and reset the necessary components.
- Restart and Update: After the process completes, restart your computer and try running Windows Update again.